Thinking, planning, making notes and sketches all go into the development of an idea for an artwork, but the process of each one is unique. I was asked to show the process that led to the two Natural History drawings I recently completed (see here and here). The very beginning was in my travel sketchbook from my long trip through the Flinders Ranges, Yorke Peninsula and Kangaroo Island, South Australia in October 2013 (see October archives for images from the sketchbook). I have been keeping dedicated travel sketchbooks, which double as journals, since a trip through the Kimberleys in Western Australia in 2004, but having said that, I have kept sketchbooks sporadically for many years – I recently found one with drawings from a trip to France in the 1970s.
People often ask if I intend to use these drawings for artworks, and generally the answer has been no, I have seen them as complete in themselves, but this time I decided I would take them on to another dimension, but still retain the sketchbook feel. It is the intricacies and detail of small objects that appeal to me rather than the big picture, so making these into a kind of documentary made sense. However, I really didn’t want to copy the drawings too precisely – I am not someone who can do detailed preliminary drawings then reproduce them precisely, each iteration loses something for me, but use these as a jumping off point.
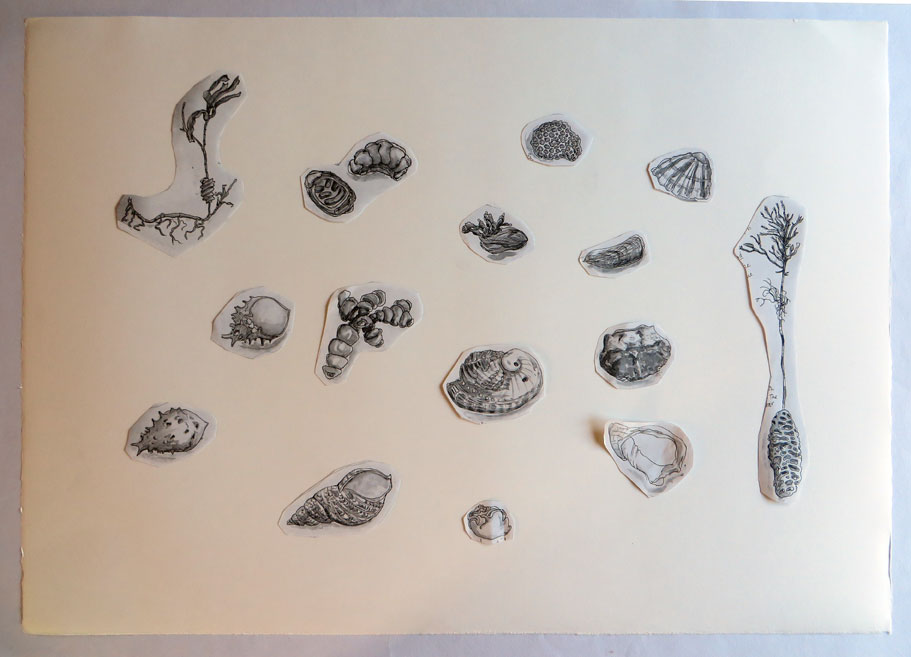
So, after thinking through the ideas (I won’t bore you with all the side alleys and dead ends I went down before settling on the approach I finally took, but believe me, it took a while!) I started to plan the artwork. I wanted it to be large, expansive but detailed. The pages from my sketchbook had already been scanned, so I chose pages that had interesting images on, printed them off, same size as the originals, and cut them up roughly. My printer is black and white, and for my purposes that was good, I wanted to just see form and not be distracted by colour. Next, these cutouts were arranged on the actual sheet of drawing paper, moved around until I was satisfied with the composition, their positions marked and numbered and the drawings numbered. I used the old technique of scribbling on the back with a soft pencil to transfer the images, again not being too particular about accuracy. Each one was then drawn up with a fine waterproof pen before I transferred the next, to minimise smudging.
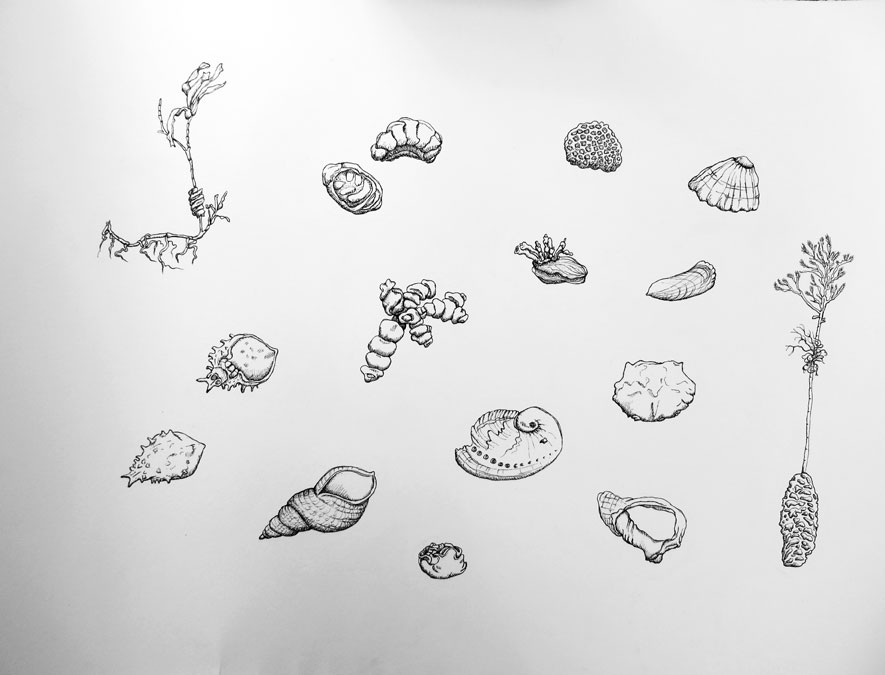
By the time I got to the stage of using pen I had decided to use pen and watercolour, as I had in the sketchbooks. My original plan was to use coloured pencil and no pen, to differentiate from the sketches, but after doing some tests, with both dry and water-soluble pencils I realised I wasn’t going to get the result I wanted, it was too soft. The next concern was whether the paper would take watercolour, as it was specifically a drawing paper, so more testing and to my relief it was fine. When I am doing the original drawings, usually time is limited, often I am drawing in an awkward position so the drawings are quick and loose, and the paint is put on quickly as well. With these drawings, the initial drawing was a bit tentative, then I went back in and added detail, tone and texture. At a quick look they are quite similar to the originals, but ultimately they are more solid and more developed, but still fairly loose.
With the second drawing, Yorke Peninsula to Kangaroo Island, by the time I had finished drawing up the images the paper looked too empty for what I wanted, so then I turned to my collections of odds and ends that I brought back with me because I didn’t have time to draw them on the spot – a couple of crab claws, a tiny cuttlefish and one or two little shells – and added them to the composition, drawing directly onto the paper without initial drawings. Once I was satisfied, then came the colour. I used my little travel paintbox, the colours are artist quality and so familiar, I didn’t want to use anything else.
The final task was adding the notations – mostly these were exactly what I had written in my sketchbook, with minor changes for clarification.
In the first photo below you can see my sketchbook, paintbox, pens, travel brushes and the paper I used for testing pencils, colours etc. Next shows the cut outs arranged on the paper, then the pen drawing, before the extra images were added. Finally a few close ups of some of the images.


Your work is fantastic Anna, MM
LikeLike
Thank you MM! You are most kind. 😀
LikeLike
This is a beautiful document. I carefully read through the text and even though your writing is very clear, the process became more apparent to me when I then looked at the images. I feel that this post is a work of art in itself and done with such love and care. Each image is fascinating but what particularly appeals to me is the top image with the paintbox itself in. It is really nice to see your tools of the trade as well as what they have produced. Your little watercolour tin is gorgeous! I have enjoyed studying your methodical process.
LikeLike
Thank you so much Julie – I was worried it was a bit dry, and too long to be digestible. I’m glad the photos helped too! It occurred to me it would be interesting to see the tools, I love seeing other people’s, and how they work as well. I have to say I LOVE my watercolour set, and I am especially fond of the travel paintbrushes, with their covers that become handles!
LikeLike
Sometimes posts need to be substantial. I have the same thought myself that a post of mine shouldn’t be too long for people – but then I think, ‘blow it. It will be as long as it has to be!’ Indeed your watercolour set IS lovable. It wanted to be admired by an audience.
LikeLike
Yes, I couldn’t really have made it any shorter. I could have made it longer though, I keep thinking of bits I could have added! Something I have also realised is that I should have interspersed the images through the text, that would have made things clearer, rather than having them as a block at the end. Things to remember for another time!
LikeLike
A very creative process Anna. The results speak for themselves-beautiful.
LikeLike
Thanks Elena! It was interesting for me to articulate it.
LikeLike
Anna, this is such a great post. Thank you for spending so much time going through your process. I adore your work!
gale
LikeLike
Thank you Gale, you are so kind! It was a really useful thing for me to do, I think it helps for another time remembering just how this all came about, giving ideas to develop further in another way, I guess as in your work the sketches feed the 3d pieces.
LikeLike
It has been lovely to see the process Anna . When you see a finished image it’s easy to underestimate the considerable time and thought and experimentation and love 🙂 that has gone into the work . These are so delicate … I love seeing the details in close up 🙂
LikeLike
Thanks so much Poppy! I often surprise myself when I look back at a finished work and remember the time and decisions that were involved, also I forget how I puzzled over solving problems. When the work is finished it all seems so obvious!
LikeLike
Wow! I thought some of my image editing processes were involved! LOL. But yours produces much better results, in my view.
Re my big idea: I was going to email you, but will put it here. Re-produce your sketchbooks for publishing as small hardback books, ie one journal for Yorke Peninsula, one for Kangaroo Island, one for the various areas of the Kimberley, and so on. Sell them at Art shops or art gallery stores and any very good bookstore. Quality to be top notch. As they stand, from what I can see and from what you have shared with us on your blog, they are fascinating and self-explanatory as is and would be a fantastic resource as well as a thing of pleasure. I have no doubt there are Australian book publishers who would love to do this for you as your artistry, paintings and writing, are most inspiring. Oxford University Press perhaps. I had thought that maybe, as a printmaker yourself, you may extend that skill to becoming a bookbinder and possibly produce them yourself. Just ideas! That’s what I do! ❤
LikeLike
Well that is a big idea Janina! Definitely something to think about. My background is in publishing (my ‘day job’ is a book designer) so unfortunately my first thought is of the pitfalls that I know are involved in a process of this kind. The idea of using my printmaking skills (and developing interest in hand-made books) appeals more than working through a mainstream publisher, I think that one definitely has legs. Thanks so much for thinking about this, its fantastic feedback, and definitely food for thought. I’ll keep you posted on what develops!
LikeLike
blurb.com is a fabulous and very easy to use self-publishing tool and bookstore, with book preview facility. Many designs and layouts and pricing you can decide yourself. You can then link to it via your blog via a button (many types). I can recommend as have used. Their print quality is the tops and reliable colours as they expect you to use the sRGB colour space. Worth investigating! Keep you occupied for a while. Then you can print off some copies for yourself and take them around to bookstores/art gallery stores for them to purchase via your blurb.com site…good idea, yeah?!! ❤
LikeLike
I will check it out, thanks Janina!
LikeLike
Very good work, Anna.
LikeLike
Thank you Bente!
LikeLike
Anna, thank you for sharing the details. I don’t know how I missed this post but I love it! The line drawings, the watercolor, your hand writing, it’s beautiful! I would just frame it and admire it everyday! It’s so crisp and clean and lovely to see. The process is so interesting. I love how you mix fine art with design, incredibly thoughtful!
LikeLike
I’m so glad you did see this, and found it interesting – you were one of the people who inspired me to write this piece! I hadn’t thought of it mixing art and design, but of course it is. So many years as a graphic designer have to come into play, and to me composition is one of the most important elements in any artwork. I think that’s why I love your photos, the composition is always perfect.
LikeLike